Showing posts with label WHAT THE MAMA WORE. Show all posts

2.20.2016

THE VINTAGE HONEY SHOP REVIEW & DISCOUNT CODE


I was recently sent this amazing teething ring by The Vintage Honey Shop to review.  I came across their wonderful shop through instagram.  Their designs are plentiful and compliment any mama and her look.  They recently launched teething necklaces in a variety of spring colours and without the large teething ring incorporated.  So many options.


The packaging was wonderful.  Just look at this detail.  Sweetly wrapped with beautiful string, a doily and a honey bee button for keeps.  Each bead is individually knotted.  The ends are finished with satin ribbon.  It allows for ease of getting the necklace on and off, but it also allows for length adjustment and it is just so darn pretty.


The Littlest Babe has been suffering.  By all accounts, she has been teething non-stop from one month on.  8 teeth emerged in a one month period.  We had tried everything:  soothers, camillia, medicine, rubbing the gums, amber necklaces, cold cloths.  Nothing would help.  I was hoping that something would soother the pain that she felt and I felt from seeing her in so much pain.


Once she latched onto it, it was hard getting her to let me model it for this post.  She was in love.  And the fact that it was attached to me while cuddling and soothing her, it made all the difference.


For those of you interested in getting your hands on one of these beautiful necklaces, please visit The Vintage Honey Shop.  Follow them on instagram and use the DISCOUNT CODE below to get 15% off before February 29, 2016:

VHSHARE


1.09.2016

TIPS FOR GOING BLONDE

Recently, I decided to dye my hair blonde.  I have always dreamed of having long luscious silver locks.  The thought of being a seventy year old with long white hair delights me to the core.  Due to time and money constraints, I must admit that I am a box-job dyer.  I love the ease of going to the store and picking out a colour.  There are also those times when I get in a mama rut and the thought of changing up my look inspires me to make more positive changes in my life.  

With that being said, here is my little tutorial for going blonde at home from dyed dark brown.  Firstly, remember PATIENCE.  You will be removing colour from your hair.  In my case, I was removing all of the colour plus hoping to strip the natural colour as well.  This presents many problems if using a box bleach.  The hair is already damaged from colour dye.  Bleaching is very harsh.  The box dye also doesn't contain the bleach volume that is needed to whiten your hair in one go.  This essentially means you must strip the hair several times before achieving the look you want.  My natural colour also has reddish and brown undertones.  Achieving a silver, white look is nearly impossible (or so I've been told).
Knowing all these things...let's begin


Choose your hair bleach.  It has been suggested to me that you use the same brand.  This could be because the formulas they use to produce the product is created and tested in the same lab.  I chose Feria by L'Oreal (Note:  this is not a vegan product by any means.  There may be vegan bleaches, I just don't know of any.  So please, if you do know some, pass along the names.)

Prep your hair.  Do not wash your hair for a week or longer.  This is not a problem for me as I rarely add soap to my hair.  I'm a non-pooer really.  Allow the oils in your hair to naturally produce themselves.  Some friends have suggested melting coconut oil, allowing it to cool and then placing it on the hair, generously.  I skipped this step.


Leave your roots last.  I cannot emphasize this enough.  When I did my first bleach, I didn't read the box and did all of my hair.  It left me looking like a skunk.  The roots were bleach white and the rest of my hair an orange.  I had to wear a hat for 3 weeks.  


Saturate the hair with bleach.  I started from my roots down.  The tips are split and damaged from wear and dyeing.  Once saturated leave on for a generous amount of time.  Check OFTEN!  I looked every 5 minutes. Do not leave on longer than 40 minutes.  This is a process and you will do it again.  You will not get the desired result immediately so please do not fry your hair and end up with no hair.  YIKES!!!

Once at the desired lightness, WASH EVERYTHING OUT IMMEDIATELY AND THOROUGHLY.  After one of my bleaching treatments I woke up to find myself at three in the morning with the most dry, dead hair.  I forgot to get it all.  I raced downstairs to the sink and just worked at it until it was gone.

Condition and Toner.  A must!  Don't skip.

Wait 4-8 weeks between treatments, cutting the ends each time.  This entire process took me over two months.  In between bleaches I did not wash my hair at all, avoided heat and conditioned with a macadamia nut oil.  Coconut oil is the best!!!

And voila!!!


Stay tuned for my next hair post about adding vibrant colour!  If you want it you must achieve this look first or even blonder!  Hope it helped and please if you have any tips or vegan sources, I'm all ears.  Comment below.

3.30.2015

WHAT THE MAMA WORE: MY 5 MINUTE EYE MAKEUP ROUTINE


Pictured above is my Maybelline eye shadow.  I honestly purchased these shadows because of their packaging, the fact that they stated they last 24 hours as tattoos and the colours are shimmery and metallic.   

Today I thought I would share my morning Eye Makeup routine.  I love to add a little pop to my eyes.  Being a tired Mama of 4 babes leaves me looking worn most days.  Adding brightness to my eyes makes me feel like I don't appear as a roaming aimlessly zombie.

I am working towards veganizing my make up, so please if you have any eye makeup suggestions.  Send them my way.  Environmentally, I do not like to part with something just to get a vegan substitute.  So these will remain in my collection until completely used or expire.

My Medusa Makeup brush and shimmery concealer was included in a Vegan Cuts Beauty Essentials Kit.  It is awesome.  Well worth purchasing the entire kit to get this baby.


This is my vegan contour brush that I use.  I purchased it through Vegan Cuts.  A while ago I purchased the Beauty Box Essentials kit.  It was amazing.  I am working towards veganizing my entire makeup go to kit.  This contour brush is amazing, applies well and is smooth on the skin.  


My cat eye look.


This is my liquid liner.  It is also a Maybelline product.  It is fine tip and makes achieving a cat eye super easy.  Also pictured is my fat pencil liner.  I use it to fill in and for blending purposes.  (It is also of the Maybelline Master line).

More of the cat eye.
My Wake Me Up Foundation.  It really wakes me up.  I apply this to my entire face to reduce the dark circles.  It works wonders.


To achieve the cat eye look I have a few simple steps.

1.  First apply concealer to all parts of the eye, blending well and applying even over the eyelid.  Allow it to set for about a minute before applying the Metallic eye shadow.

2.  Using your finger, apply to the lid gold Mettalic Maybelline eye shadow to the eye lid.  Put a little of the silver eye shadow in the corner of the eye for brightness.
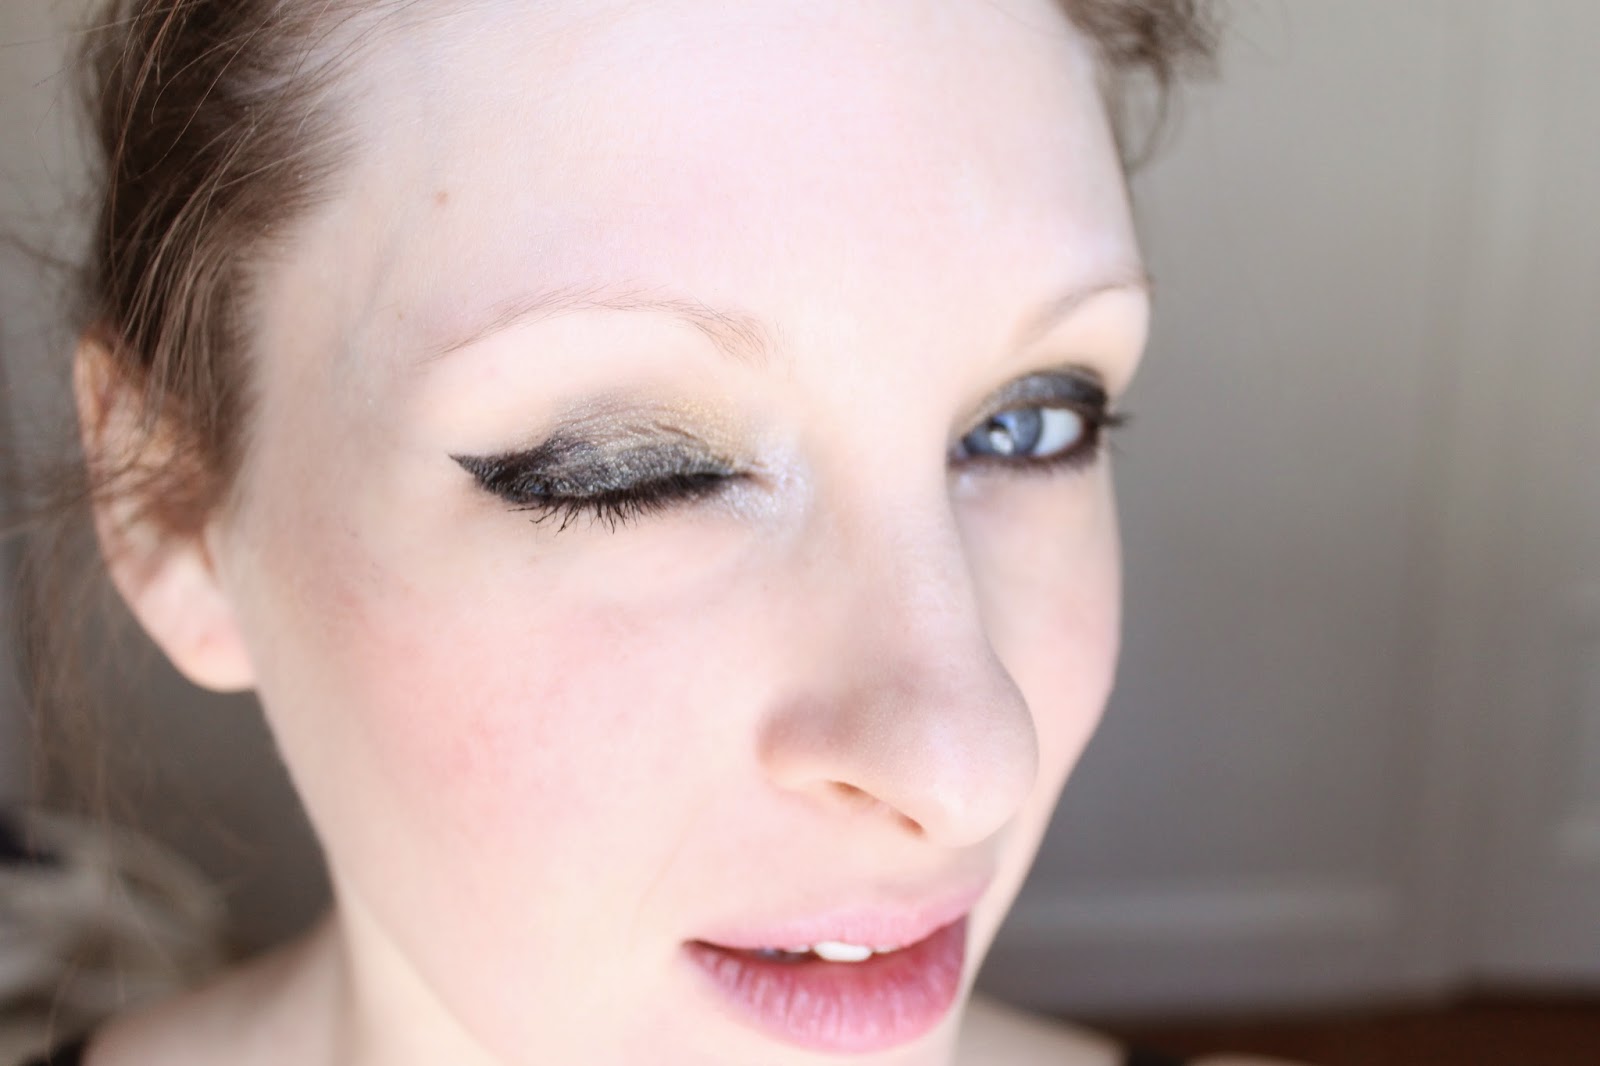
3.  Using the think pencil apply along the lower lid line and from the middle of the pupil outwards towards the edge of the eye on the line of the upper lid.

4.  Using your vegan contour brush blend from the outside of the lid towards the centre the black liner and gold.

5.  Finish with a cute cat eye.  I make it so the liquid liner comes out as far as the farthest point of my brow.

6.  Dust, using the Medusa brush and shimmer over the entire face and lid to conceal the look.

VOILA!

This is me all dolled up!  P

Please feel free to suggest any vegan options that would work for a winter, dry and oily summer face. I am willing to try new brands and vegan is always the best option for your face.

1.04.2015

WHAT THE MAMA WORE: BLACK NAILS

I have a deep obsession with the colour black.  It stems from simplicity and I find it exceptionally chic.  Black hair, black clothes, black chalkboard walls.  I have become a little daring in the past year and have ventured into the realm of gold.  I think it is the deepest I will venture into colour.  Sometimes you will see me wearing red plaid, or even a hint of royal blue.   I thought today I would share my favourite nail routine.


 Basically, when I have time, I clean my nails.  I find it best not to apply polish right after a bath or shower.  With a file, I file straight across.  For this particular manicure, I used whatever black I had.  I am not sure which brand because I usually rip off the label because I am obsessive compulsive and I like a clean looking bottle.  To apply the polish, put a thin coat.  One dip of the brush should do one nail.  Once dry, I apply a second thin coat.

 Pictured above is the other colour I eventually applied.  I personally didn't like the gold tips I applied so I redid everything from scratch.  But Sally Hansen is a go-to polish for us in this house.  Sally Hansen has never let me down:  cheap, good coverage, amazing colour selection.


Ta-Da!  The finished look.  Good for all types of events.  Especially covering up the fact that you have mega dirt under your nails from not showering consistently due to the caring of 4 little babes and still making you appear that you have things together.


 The Eldest Babe got in on the action.  Doing our nails is a ritual we share.  It is in those moments of choosing our colours and applying them to their little hands that we share thoughts in our minds and hearts.  I know it is mega-girly mama cliche but we love it.

 (This is the look I didn't go with.  What do you think?)  Also, I am really interested if anyone knows of any amazing vegan cosmetic brands (specifically nails).  I am looking to update my look and would love to be cruelty free.  Vegan Cuts is amazing in terms of sampling various beauty brands.  Limecrime looks awesome.  Any thoughts?

7.30.2014

WHAT THE MAMA WORE: BUMP HUMP


This lovely dress has been sitting in my closet for over a year.  I bought it from a ModCloth when I was close to my pre baby weight with Vye.  I never felt confident enough to wear it because I was bigger up top.  But now I am big all over and it fits nicely with my curves.  There is the cutest Peter Pan collar that ties in the back.  The black lace gives a nice elegance and it so light and airy.  I feel like a fairy.  The copper dress underneath, on a non-pregnant lady would fall nicely to the base of the dress where the lace ends.  I kind of like how it falls on my pregnant frame, ending just where the floral lace ends.  As the pregnancy continues I will continue to find comfy wears.  Please suggest some if you know of them ladies.


11.24.2013

WHAT THE MAMA WORE: FROZEN AZTEC


Yesterday we had the first snowfall in our small ontario town.  It is a soft blanket of frozen crystals that warms my heart with thoughts of everything "cozy": hot chocolate with a hint of cinnamon and chile, knitting the blanket for the babe I started a week before her birth, dreaming of building snow castles and sliding on icy hills, creating memories while rosy-ing our cheeks.  Winter solstice is but month away but it's presence is welcomed enthusiastically.

black beanie & mittens from
Target (I needed them desperately) // all other items were thrifted // the blue Aztec poncho was thrifted from a vintage etsy shop